

You have just bought a theme, downloaded a file with a long name, and now you are staring at an empty WordPress dashboard wondering what happens next. Good news: installing a theme is one of the easiest jobs in WordPress. It takes about ten minutes, and you do not need to write a single line of code.
Let's take the popular theme Garnet as an example. The steps are the same for almost every theme you will ever install, so keep this page handy.
Before you start
Take two minutes to check these. They prevent nearly every installation problem we see.
- A working WordPress site. Garnet needs WordPress 6.4 or newer and PHP 7.4 or newer. Your hosting control panel shows both versions, and your host can upgrade PHP for you.
- An administrator login. Only administrators can install themes.
- The right file. On ThemeForest, open your Downloads page and find your theme. The download button offers two choices: "All files & documentation" and "Installable WordPress file only". For this guide you need the installable WordPress file. It is a single zip file named after the theme.
- A backup if the site already holds content you care about. Installing a theme does not delete anything, but a backup is cheap insurance.
Tip: "All files & documentation" is one big zip that contains the installable zip, the documentation and other extras. If you upload that bigger file to WordPress, the install fails. Unzip it once on your computer and use the smaller zip inside.
Step 1: Open the theme uploader
- Log in to your WordPress dashboard.
- In the left menu, go to Appearance → Themes.
- Click the Add Theme button at the top of the page (older versions say "Add New").
- Click Upload Theme.
Step 2: Upload the zip file
You will now see a small box asking for a file.
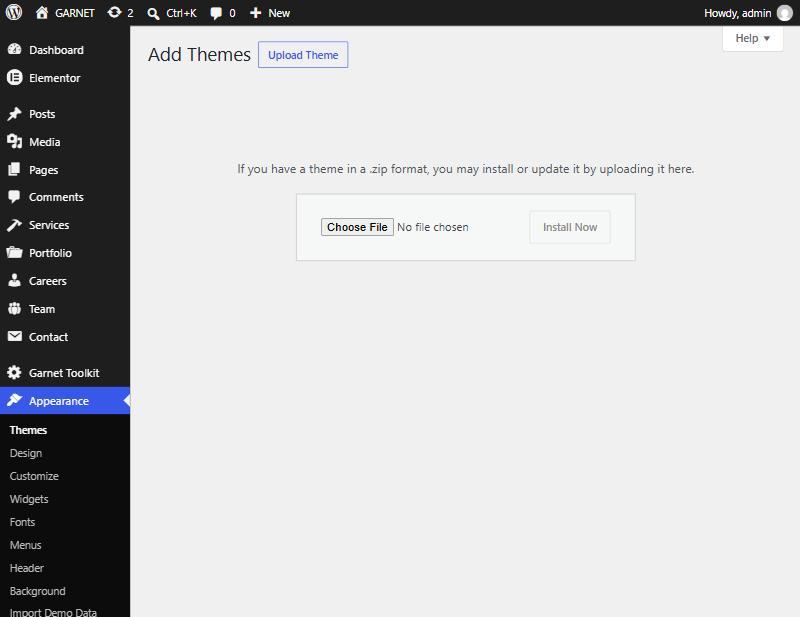
- Click Choose File and select the installable theme zip, for example the Garnet zip.
- Click Install Now.
- Wait while WordPress unpacks the theme. When you see "Theme installed successfully", the hard part is done.
Step 3: Activate the theme
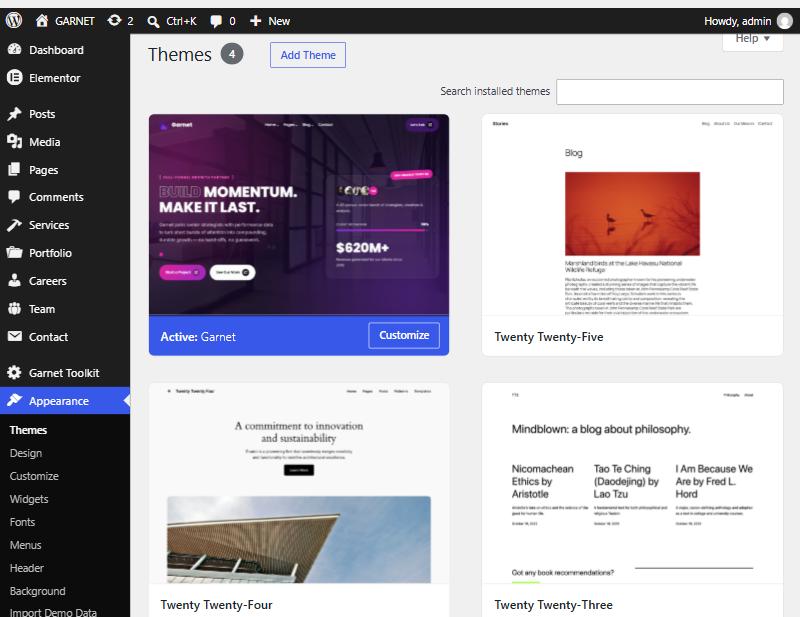
Installing puts the theme on your site, but it does not turn it on. On the success screen, click Activate. You can also go back to Appearance → Themes, point at the theme and click Activate there.
The activated theme moves to the first place in the list and is marked Active.
Step 4: Install the recommended plugins
Many premium themes keep their special features in plugins. This keeps your site fast and lets you update those parts on their own. As soon as Garnet is active, WordPress shows a notice at the top of the dashboard with a Begin installing plugins link.
- Click Begin installing plugins.
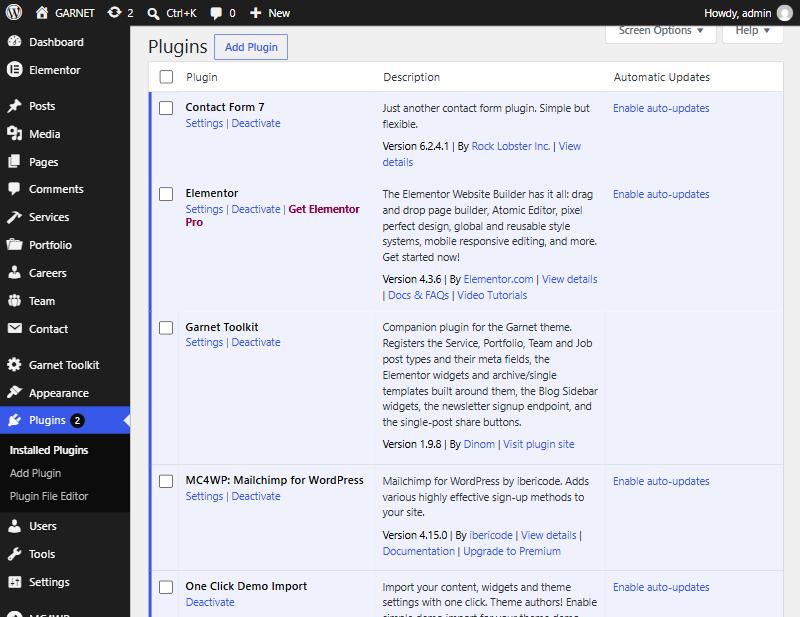
- Tick the plugins in the list. For Garnet these are Garnet Toolkit, Elementor, Contact Form 7 and One Click Demo Import. Mailchimp for WP is a nice extra if you want a newsletter form.
- Choose Install from the bulk actions menu and click Apply.
- When it finishes, select the same plugins again, choose Activate and click Apply.
Open Plugins → Installed Plugins to check. The ones you need should say Deactivate beneath their names, which means they are active.
Step 5: Look around and make it yours
Visit your site. At this point it will look fairly plain, because you have installed the design but not the sample content. You now have two choices:
- Import a demo to copy a finished sample site onto yours, and edit it. This is the quickest way to a good-looking site. Read our guide One-click demo import explained.
- Build from scratch. Create your pages under Pages → Add New, set up a menu under Appearance → Menus, and adjust the logo, colors and fonts under Appearance → Customize.
Prefer FTP? There is another way
If your host limits the size of uploads, you can install the theme by hand. Unzip the installable file on your computer, connect to your site with an FTP program, and copy the unzipped theme folder into wp-content/themes. Then go to Appearance → Themes and activate it as usual.
If something goes wrong
| What you see | Likely cause and fix |
|---|---|
| "The package could not be installed" or "style.css is missing" | You uploaded the full download instead of the installable file. Unzip it and upload the smaller theme zip inside. |
| "The uploaded file exceeds the upload_max_filesize directive" | Your server limits upload size. Ask your host to raise it to 64M, or install by FTP as described above. |
| "Destination folder already exists" | A copy of the theme is already installed. Open Appearance → Themes and activate it, or delete the old copy first. |
| The theme will not activate, or WordPress reports a requirement | Your WordPress or PHP version is too old. Update WordPress, and ask your host to switch to a newer PHP version. |
| A blank white screen after activating | Usually a low memory limit or an old PHP version. Raise memory_limit to 256M, then check the PHP version. |
| The site looks plain or broken | The recommended plugins are not active yet. Go to Plugins and activate Garnet Toolkit and Elementor. |
Still stuck? We are here to help
If you have tried the fixes above and the theme still will not install, open a support ticket. Tell us the exact message you see, your WordPress and PHP versions, and add a screenshot. The more detail you share, the faster we can sort it out.